Aug
08

How to install outdoor tennis posts in Irish schools & sports clubs.

Outlined below please see an outdoor tennis ‘Parts’ list and our installation steps.
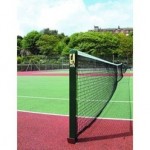
Department of Education PEO/150 Outdoor Tennis parts list

  1. tennis ground sockets (92mm internal diameter) (2)
  2. tennis caps (2)
  3. tennis upright posts, (89mm external diameter) (2)
  4. tennis external winder (1)
  5. tennis net, 2.5 mm twine (1)

Step 1 – Tennis Posts Positioning:

Determine the correct positions to install the tennis ground sockets. Tennis posts are set 42’ apart for a doubles court and this measurement is made from the center of one post to the center of the other. Also, take into account tennis line marking dimensions and allow for at least 1m for an adequate run-off safety area.

Step 2 – Tennis Ground Sockets installation:

Each tennis socket requires a hole size of minimum 500 mm diameter and approximately 400 mm depth. Ensure tennis socket is set level with the ground after installation, use a spirit level. At this point, pour the concrete into the hole surrounding the tennis sockets making sure the tennis caps are covering the tennis sockets. It is essential that tennis ground sockets are correctly installed to ensure the tennis poles are upright. Allow tennis sockets to settle for a minimum of 48 hours before setting up the tennis posts.

Step 3 – Tennis Post set up:

Tennis posts & nets should be set up by an adult. Remove the tennis caps and place the tennis upright posts into the tennis sockets. Now attach the tennis net to the external winder.  Measure the height of the net near the posts. The top of the net tape should be approximately 42 inches from the ground.

Tenis Posts Safety Notes:

Inspect the tennis winder and tennis nets at regular intervals. Children should not climb on the tennis posts and should always be supervised using any sports equipment. An adult is required for set up.

Hopefully this information concerning outdoor tennis installation & set for Irish schools and sports clubs was helpful.

If you require any further information or literure on installing outdoor tennis or indeed tennis equipment in general please don’t hesitate to contact niall clancy, marketing; niall@fitnessfunctions.ie


Jul
27

Outdoor Basketball Installation & Assembly


Fitness Functions have supplied & installed numerous Outdoor Basketball sets to primary and secondary schools all over Ireland which conform to the Department of Education Outdoor Specifications.

Outdoor basketball

Outdoor basketball posts

Sometimes we only supply the school with the outdoor basketball equipment and they install & assemble the outdoor sets themselves. We have advised many schools on outdoor basketball issues. Below please see some important points which should be helpful.

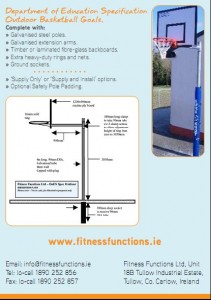
Outdoor Basketball (PEO/150) parts list

  1. - ground socket (2)
  2. - upright 88.9mm pole (2)
  3. - insert caps (2)
  4. - extension arm with board bracket (2)
  5. - 4ft x 3ft board (2)
  6. - heavy duty ring and net (2)
  7. - protective padding (2) (optional)
  8. - pack fixings & safety labels (optional)

- Click to View Outdoor Basketball Set -

Outdoor School Basketball Installation Guidelines (School Caretaker / Groundsman)


  1. Install ground sockets at correct locations. If basketball court is unmarked check with architect or client for clarification. Each basketball socket requires hole size of min 500mm diameter and approximately 900mm depth. Ensure the basketball socket is set level with ground after installation. Concrete should be painted after installation. Vital: it is essential that ground sockets are correctly installed to ensure basketball poles are upright.
  2. Court size; sockets should be set 28m apart where possible, but at least 1.m from end fences/walls. If necessary reduce court size to allow adequate safety runoff.
  3. Allow basketball sockets to settle for a minimum of 48 hours before assembling the goals. Two adults should assemble the units. First place extension arm over the upright, lock the arm to the pole at approximately 4ft. Now, the board and ring should be attached to the basketball extension arm using the bolts supplied. Ensure the basketball board is level and plumb. Black target box should be towards the bottom of board-top of ring should line up with bottom line of small rectangle box (150mm from bottom of board).
  4. Using a step ladder and bracing bar, bring the basketball board/arm/ring combination to the correct height. Lock the grubscrews/bolts into position using allen key/19mm ratchet.
  5. The correct height from ground of the basketball ring is 10ft for seniors and 8ft6” for juniors.
  6. Ensure all bolts are fully tightened and attach safety warning labels to boards and/or uprights. Finally, attach safety padding (if supplied)
  7. Inspect the goals at regular intervals and tighten bolts where necessary. Check basketball safety padding for damage.
  8. Children should not climb on the framework and should not be unsupervised using any sports equipment.
  9. Two competent adults are required for this assembly.

Contact Fitness Functions.

If you have any further queries or require some marketing literature regarding installation of outdoor basketball equipment please please feel free to contact niall clancy, niall@fitnessfunctions.ie


Jul
14

Fitness Functions are delighted to announce our new blog

Fitness Functions, as an Irish company, provide a unique service as complete sports equipment suppliers & installers. Our experienced in-house fitters install and service sports equipment in sports halls and outdoor play areas throughout Ireland. Typically, our main customers are schools, universities, community centres & sports clubs.

We hope to keep our clients and visitors updated with competitions, news and sports and installation related news here on our blog.

Why not get involved and let us know if you have any suggestions or feedback?